Basic of Fundraising
Planning to raise funding in the upcoming months but still confused on how it works? No need to fret. Let us guide you through every step of the investment process and help you make the most out of QuotaBook’s features designed for you.
Seeking Financing from a VC
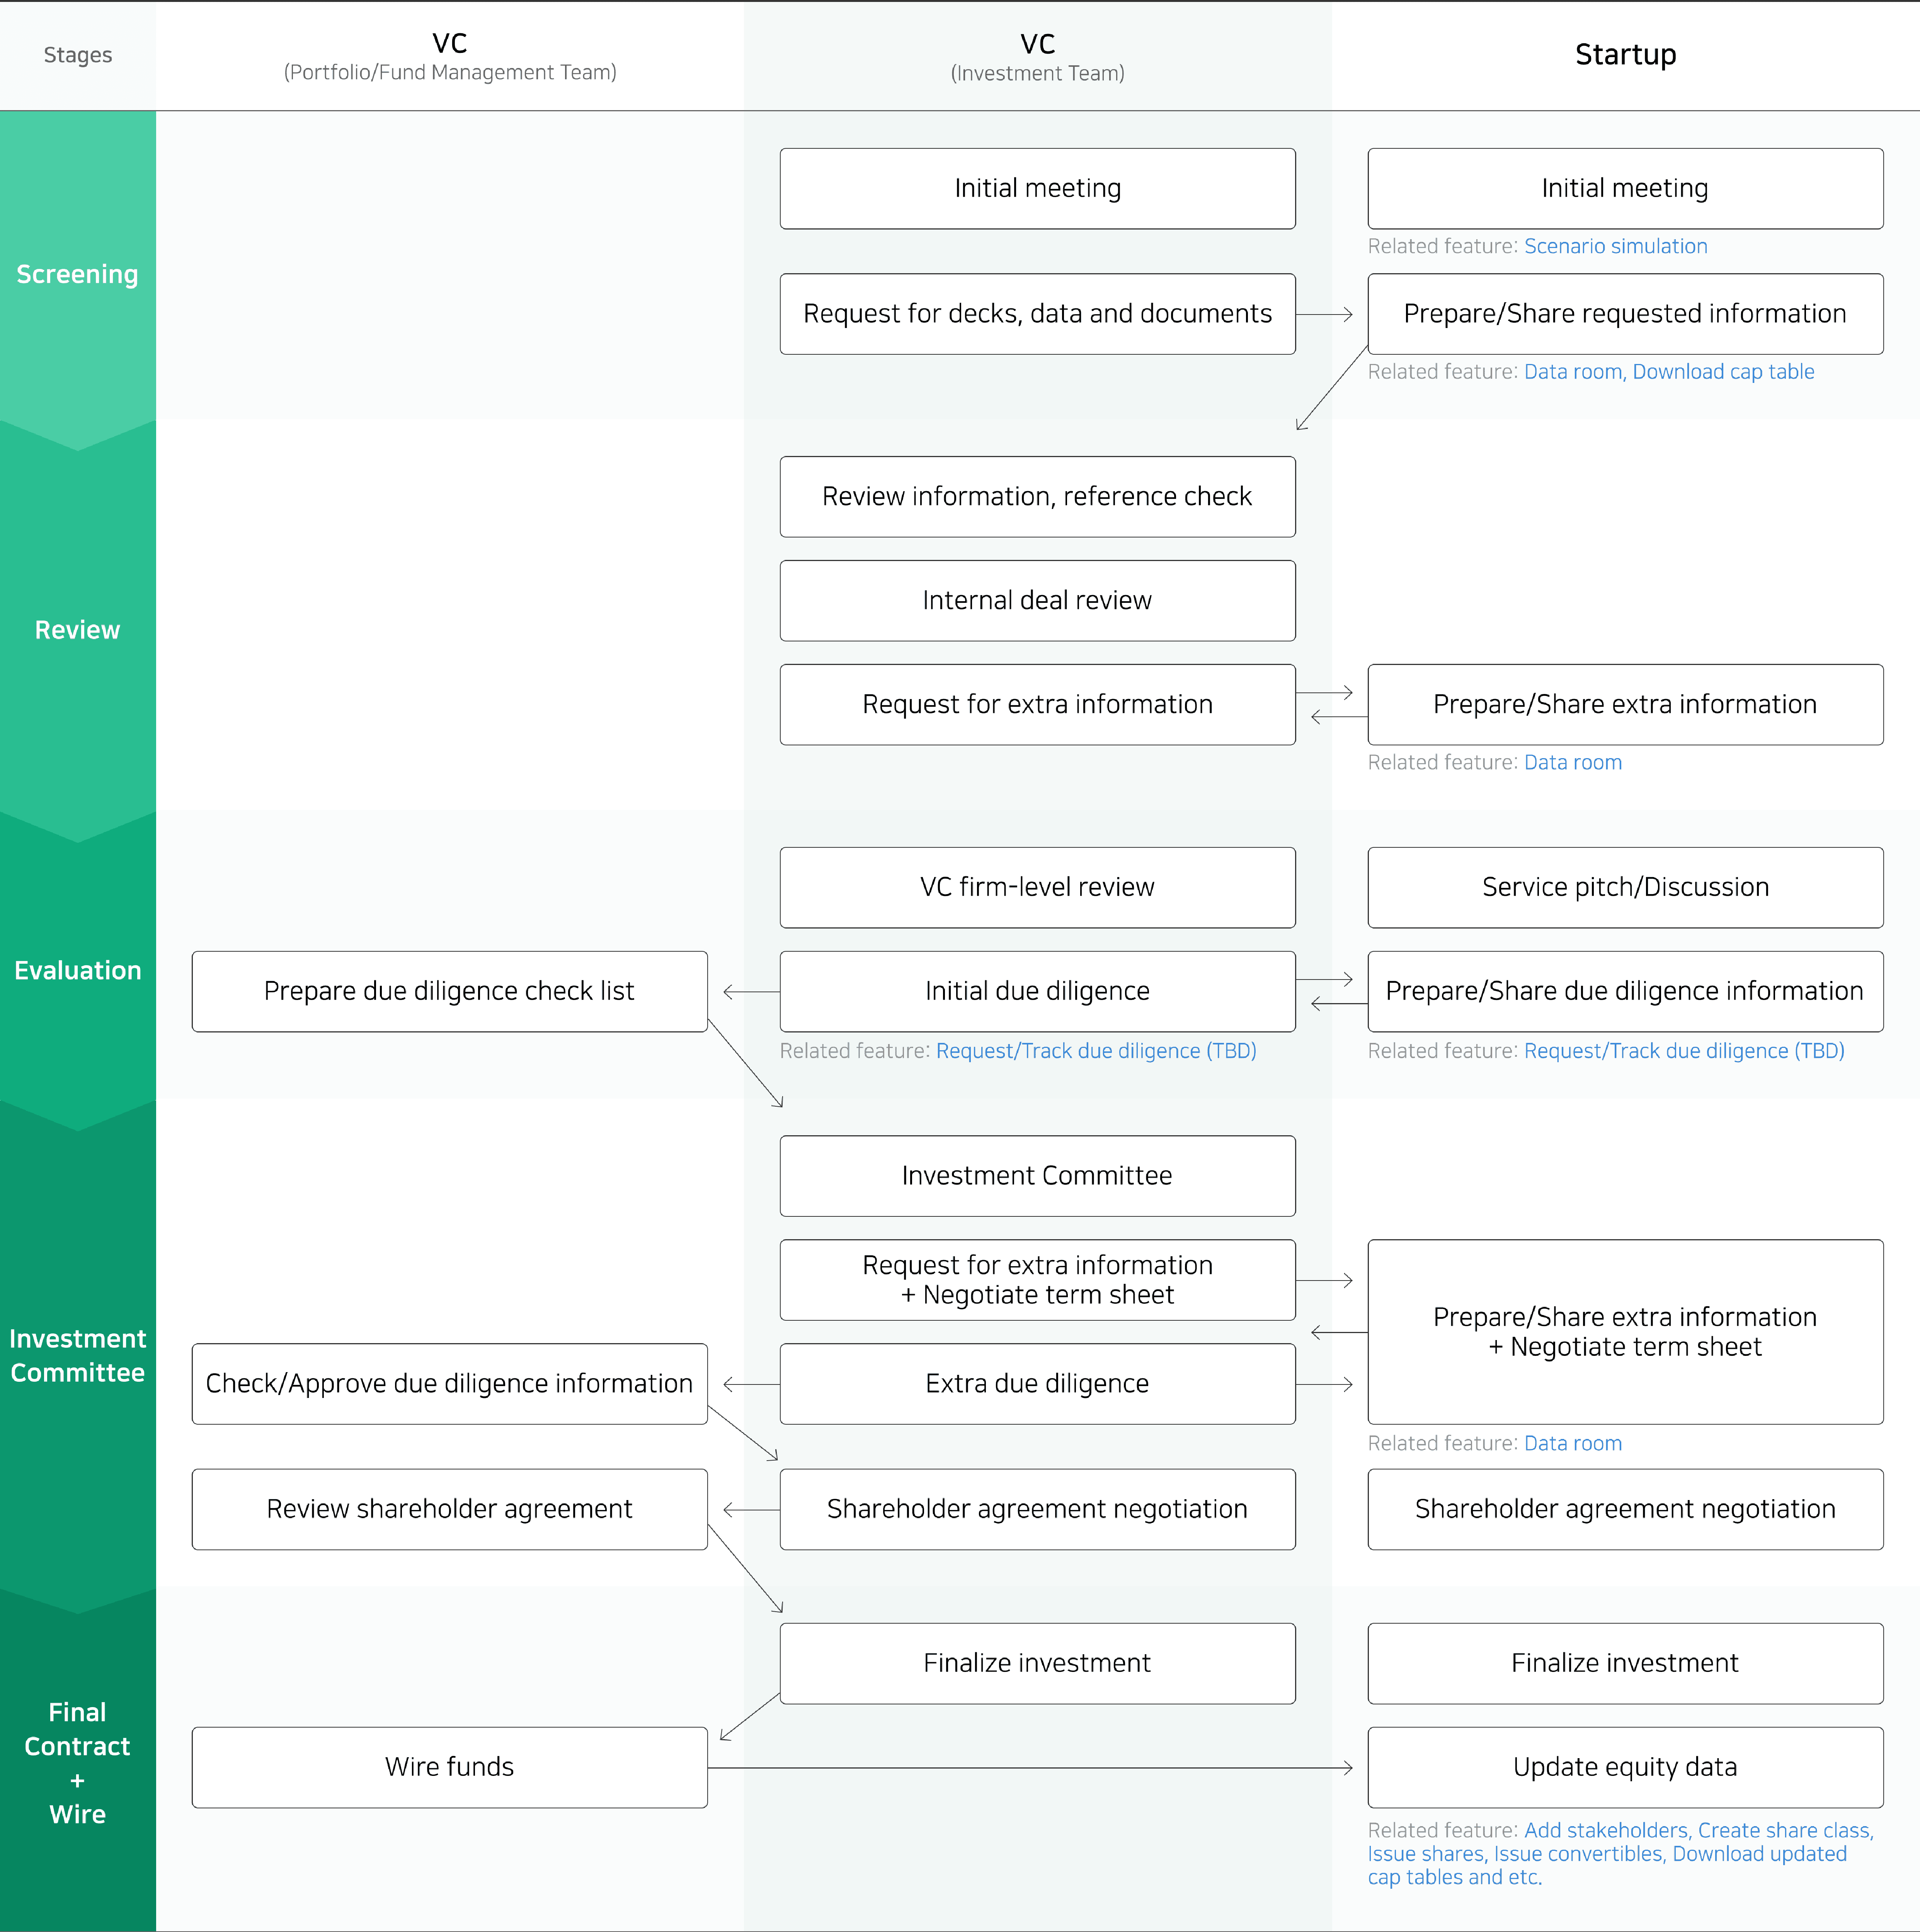
In general, there are six stages from the first meeting to the actual wire transfer of the funds.

Three groups are involved in the investment process.
Startups
Investors - VC / Investment principals
Investors - Portfolio / Fund management teams
A summary of the activities at each stage is provided below. It’s best to have all the necessary information ready to share to ensure smooth operations ahead.

The entire process — from the first meeting to the final contract and wiring of money — may sometimes take over a year. Through QuotaBook, you can better streamline the whole process and more efficiently manage and close your investment.
Now let’s take a closer look at how QuotaBook can help you every step of the way.
1. First meeting with investors

Nailed the first meeting with your investors? Congratulations!
Once the VC starts to review your company as a serious potential investment opportunity, they will then discuss the company valuation and size of the investment. These two factors may change the company’s shareholding percentages by a great deal. Use our simulation feature to model all different scenarios to find the best case for your enterprise.
VCs will most likely request a lot of documents during and after the first meeting for evaluation and review. Use QuotaBook’s Data Room feature to manage relevant materials by round, share with multiple investors, and monitor who actually accessed which documents.
2. Review

After your successful meeting with the investors, the investment team will continue to request for a lot of information. This is part of a process to convince their colleagues at the firm and may take over several months.
As they are reviewing multiple startups at once, this request and review period may be delayed. On QuotaBook, you can check the investors’ interest levels real-time through the access log feature of our Data Room.
💡 Tip: Keep track of questions or any requests that investors have at the meeting. This will be helpful in updating your pitch materials and preparing for certain data that investors are interested in.
3. Evaluation

When principals are sure about your company and so are their colleagues, they will proceed with initial due diligence. The management side of the VC will prepare a due diligence checklist, and the investment team will request related information from you.
Due diligence is a thorough process to investigate the overall health of the company. The investment team will ask a series of questions and a range of documentation. Investment principals will continue to discuss internally if your company is the right fit for investment through this process. Make sure you are prepared to deliver the best, yet honest impression of your company.
💡 Through this due diligence, investors will evaluate not only the business and legal foundation of the company but also how your company is handling the whole process and the speed.
Due Diligence, still confused? No worries - QuotaBook is currently building features that investors can request documents they need, and the startup can quickly respond on the platform.
4. Investment committee
Now the investment team will work hard to pitch your company to the senior members of the firm at the investment committee.
The deal team will prepare an investment memo to circulate and a presentation to convince the main decision-makers of the firm prior to the IC meeting. This process is at the heart of winning an investment. You must be prepared to meet the investors’ requests promptly and proactively.
Again, Data Room feature comes in handy here. Invite investors over, share necessary documents quick and check access logs to see if everything was delivered properly.

When ready, the investment committee will approve or reject investment opportunities and identify areas of improvement on company value and risks.
When the committee says “yes” to the investment opportunity, they will conduct extra due diligence. You might also receive a term sheet to negotiate the nuts and bolts of the potential deal. A term sheet is not a guarantee for the investment, but it signals that the investor is serious about this investment.
The second due diligence involves a more technical overview of the company through accounting professionals. They will review all the relevant documentation and may visit the company site in person.
Every VC firm has works differently in terms of the IC and agreement negotiations. It’s always best to communicate with the investors to make sure you are on the same page with them.
It may take more than three weeks from planning a company visit til drafting a final report. Note that these onsite visits or additional due diligence do not mean that the investment has been finalized.
5. Final Contract & Wire Transfer
On the day of the shareholder agreement, you will prepare all the necessary documents to sign and seal the deal with the investors. They are now legally ready to be your new shareholders!
But it’s too early to loosen up yet.
On a very rare occasion, investors may delay wire transfer even after the deal has been closed. It is best to be on alert and check every box down the list.

Once you checked the investment has been wired, the long process is complete. Make sure to update data on QuotaBook by adding new stakeholders and issuing shares (once the investors have wired funds).
Congratulations on Securing a New Investment!
Glad you made it! QuotaBook will continue to support your journey.
References